Chapli Kebab Recipe: Pakistani Pashtun Kebabs
Learn to make authentic Chapli Kebab, the legendary Pakistani Pashtun kebab from my Khoozh baba. Crispy edges, tender center, bursting with flavor.
This is the kebab that ruins all other kebabs for you.
Welcome to Deeva’s Dastarkhwan - a series I’ve wanted to start for a long time, to share the food I grew up on, the culture that carried me, and the recipes I’ve picked up along the way. And what better way to start than with Chapli Kebab, a dish that holds a piece of my heart.
Chapli kebab is more than just food to me. It’s a memory of standing quietly in the kitchen, watching my Khoozh baba make these without a recipe, without measurements - he just always knew. In Pashto, we call a dining spread “Dastarkhwan,” but to me, it was just the place where I sat close enough to my baba for him to feed me off his plate, where I learned how food smells after it’s cooked and how love sounds without words.
What is Chapli Kebab?
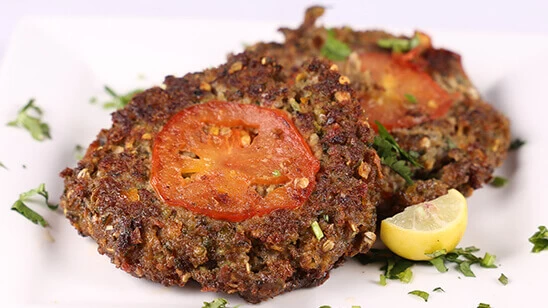
Chapli Kebab is a Pashtun dish from the borderlands of Northwestern Pakistan and Eastern Afghanistan. Unlike your typical grilled kebab, these are pressed wide and thin, then pan-fried to crispy, golden perfection. The name comes from either the Pashto word “chapreekh” (meaning flat), or from the action of how you gently “chap” it into shape before it hits the pan. Either way, that distinctive flat shape serves a purpose - it cooks faster, gets beautifully crispy at the edges, and stays tender and juicy in the middle.
What makes Chapli Kebab truly special is what goes INTO the meat. Fresh coriander seeds, green chilies, mint, cilantro, and little pieces of tomato are mixed right into the beef, so every single bite is bursting with flavor and texture. Then, the addition of anardana (pomegranate seed powder) gives it a subtle tanginess that really rounds out the flavor.”
When you pan-fry them in ghee or oil, the edges get this incredible crispy crust while the center stays soft and juicy. It’s honestly perfection.
Why This Recipe is So Special to Me
Growing up, I didn’t know this was “culture.” It was just dinner, something my Khoozh baba made when he wanted to take care of us. I didn’t realize he was teaching me who I was until I was old enough to miss it.
I used to stand in the kitchen and watch him work - the way he’d squeeze the onions dry in his hands, the way he’d grind the coriander seeds fresh, the way he’d shape each kebab with such care. He never measured anything. He cooked with his heart, with muscle memory built over decades, with love that didn’t need words.
Now, when I make these, I feel him with me. I hear the sizzle of the kebabs hitting the hot oil, smell the coriander toasting, see the edges turning that perfect golden brown. And for a moment, I’m seven years old again, sitting at his Dastarkhwan, being fed from his plate.
This isn’t just a recipe I’m sharing with you. It’s honestly a part of my heart. From my Dastarkhwan to yours - this is Chapli Kebab.
Ingredients
For the Kebabs:
- 800g ground beef (preferably 20% fat - you want some fat for juiciness!)
- 1 large white onion, finely chopped
- 4-6 fresh green chilies, chopped (adjust to your spice preference)
- ¼ cup fresh mint leaves, chopped
- ¼ cup fresh cilantro, chopped
- ½ fresh tomato, chopped (other half for topping)
Spices:
- 2 tablespoons red chili flakes
- 4 tablespoons freshly ground coriander seeds (THIS IS KEY!)
- 2 teaspoons anardana powder (pomegranate seed powder)
- 2-3 teaspoons salt (to taste)
- 1½ teaspoons baking soda (the secret binding agent!)
For Cooking:
- Oil or ghee for pan-frying (ghee gives the most authentic flavor)
- Thin tomato slices for topping
To Serve:
- Naan, roti, or chapati
- Sliced raw onions
- Lemon wedges
- Green chutney
- Raita
Instructions
Step 1: Squeeze That Onion Dry!
Finely chop your large white onion into tiny pieces. Place all the chopped onion in a cheesecloth or clean kitchen towel. Gather the edges and twist it tight, squeezing out as much liquid as you possibly can. Really squeeze it hard! You want that onion as dry as possible.
Why this matters: The onion liquid will make your kebabs fall apart. We want the flavor of the onion without the moisture.
Set your dry onion aside in a bowl.
Step 2: Prep Your Fresh Ingredients
Finely chop your green chilies. I use 4-6 Thai green chilies because I love spice, but you can adjust based on your preference. Start with 2-3 if you’re unsure.
Roughly chop your fresh mint and fresh cilantro. Don’t stress about making them super fine - a rough chop is perfect. The fresh herbs add such an incredible brightness to these kebabs.
Take your tomato and chop half of it into small pieces. Slice the other half into thin rounds - these will go on top of each kebab before cooking. The tomato on top caramelizes beautifully and looks gorgeous!
Step 3: Combine Everything
In a large mixing bowl, add your ground beef. I recommend using beef with about 20% fat content - you want some fat for juiciness and flavor. Too lean and your kebabs will be dry.
Add your squeezed-dry onion, chopped green chilies, mint, cilantro, and the chopped tomato pieces. Use your hands to gently mix everything together. Don’t overmix yet - we still have spices to add.
Step 4: Add the Spices
Now comes the flavor! Add:
- 2 tablespoons red chili flakes (this gives that signature color and heat)
- 4 tablespoons freshly ground coriander seeds (grind whole seeds in a spice grinder - the fresh flavor is ESSENTIAL)
- 2 teaspoons anardana powder (that subtle tanginess that makes people say “what’s in this?!”)
- 2-3 teaspoons salt (start with 2, taste a tiny bit of the mixture, adjust)
- 1½ teaspoons baking soda (this is your secret weapon - it helps bind everything!)
About the baking soda: This might seem weird, but baking soda is what keeps your kebabs from breaking apart during cooking. It creates a slightly sticky texture in the meat mixture that acts like glue. Don’t skip it!
Step 5: Mix Thoroughly
Now use your hands to really mix everything together. Squish it between your fingers, fold it over itself, really work it. You want all those spices and fresh ingredients evenly distributed throughout the meat. The mixture should start to feel slightly sticky and well-combined. This takes about 2-3 minutes of mixing.
Pro tip: If you have time, let this mixture rest in the fridge for 30 minutes. It helps the flavors meld and makes shaping easier. But if you’re hungry now (like I always am), you can cook them right away!
Step 6: Shape the Kebabs
Here’s where the traditional shape matters! Take about ½ cup of the mixture and roll it into a ball in your hands. Then flatten it - and I mean really flatten it. These should be wide (about 4-5 inches across) and thin (about ½ inch thick).
The wide, flat shape is what makes Chapli Kebab special. It’s not a thick burger patty - it’s thin so it cooks fast and gets those incredible crispy edges while staying juicy inside.
Once shaped, press a thin slice of tomato on top of each kebab. Press it down gently so it adheres. This tomato slice will caramelize during cooking and look (and taste) amazing.
Note: You should get about 8-10 kebabs from this recipe, depending on size.
Step 7: Heat Your Pan
Get a large skillet or frying pan and add 2-3 tablespoons of oil or ghee. I HIGHLY recommend ghee for the most authentic flavor - it’s what my Khoozh baba always used. Heat it over medium heat.
How do you know it’s ready? Drop a tiny pinch of the meat mixture into the oil. If it sizzles immediately, you’re good to go. If nothing happens, wait another minute. If it’s smoking, your heat is too high - lower it!
Step 8: Pan-Fry to Perfection
Carefully place 2-3 kebabs in the pan. Don’t overcrowd them - they need space!
Let them cook for 4-5 minutes on the first side without moving them at all. This is how you develop that beautiful golden-brown crust. Resist the urge to flip them early! You’ll know they’re ready to flip when:
- The edges look crispy and browned
- The top has changed color (looks more cooked than raw)
- When you gently shake the pan, they move as one piece (not stuck)
Flip carefully - they’re delicate! Cook another 4-5 minutes on the second side. The tomato slice should be caramelized and slightly charred at this point, and both sides should be gorgeously golden brown.
Step 9: Drain and Repeat
Remove your cooked kebabs to a plate lined with paper towels. This absorbs excess oil. They’ll still be beautifully moist inside!
Add more oil or ghee to the pan as needed and repeat with the remaining kebabs. I usually get through the whole batch in 3 rounds of cooking.
Step 10: Serve with Love
Serve these beauties warm! They’re traditionally eaten with:
- Fresh naan or roti for scooping
- Sliced raw onions (the sharpness cuts through the richness)
- Lemon wedges (squeeze over for brightness)
- Green chutney or mint chutney
- Raita (yogurt sauce) on the side
But honestly? They’re so flavorful you can eat them completely on their own. Sometimes I just eat them straight from the pan because I can’t wait!

Chef’s Tips for Perfect Chapli Kebab
Fresh Ground Coriander is Non-Negotiable: Don’t use pre-ground coriander powder for this. Buy whole coriander seeds and grind them fresh in a spice grinder or mortar and pestle. The fresh, citrusy aroma is what makes Chapli Kebab taste like Chapli Kebab. This is the #1 most important spice in the recipe.
Don’t Skip the Baking Soda: I know it seems weird, but it’s the secret to keeping these from falling apart. Just trust the process!
Make Them Thin: These aren’t burgers! They should be wide and flat. That’s the whole point. Thin = crispy edges + fast cooking + proper texture.
Medium Heat is Key: Too hot and the outside burns before the inside cooks. Too low and they’ll be greasy and pale. Medium heat gives you that perfect golden crust.
Use Ghee if You Can: It makes such a difference in flavor. But if you don’t have ghee, regular oil works too.
Don’t Flip Too Soon: The first flip is scary because they’re delicate. Wait the full 4-5 minutes. If you flip too early, they’ll break.
Ingredient Substitutions
Ground Beef Alternatives: You can use lamb or a beef-lamb mix (actually very traditional!). Some people even use chicken, though that’s less traditional. If using chicken, make sure it has some fat content or it’ll be dry.
Can’t Find Anardana?: While anardana (pomegranate powder) is pretty essential for authentic flavor, you can substitute with a squeeze of lemon juice mixed into the meat, or even a tiny bit of sumac. Won’t be exactly the same, but still delicious.
Fresh Herbs: If you can’t find fresh mint, you can use dried mint (about 2 tablespoons), though fresh is WAY better. Fresh cilantro is important - don’t skip it!
Spice Level: Want them milder? Reduce green chilies to 2 and red chili flakes to 1 tablespoon. Want them spicier? Add more chilies and throw in some crushed red pepper!
Baking Soda Alternative: If you’re really against baking soda, you can use 1 egg as a binder instead. But i prefer baking soda.
What to Serve With Chapli Kebab
These kebabs are incredibly versatile! Here’s how I love to serve them:
Traditional Style:
- With fresh naan or roti
- Sliced raw onions on the side
- Lemon wedges for squeezing
- Green chutney for dipping
- Raita (yogurt, cucumber, mint sauce)
- Fresh cilantro for garnish
Storage and Reheating
Storage: Store cooked kebabs in an airtight container in the fridge for up to 3 days. They’re honestly amazing cold the next day too!
Reheating:
- Best method: Heat in a skillet with a little oil to crisp them back up
- Fast method: Microwave for 30-60 seconds (they won’t be crispy but still tasty)
- Fancy method: Air fryer at 350°F for 3-4 minutes (gets them crispy again!)
Freezing Raw: You can shape the kebabs and freeze them uncooked between layers of parchment paper. Freeze for up to 2 months. Cook from frozen - just add 2-3 extra minutes per side.
Freezing Cooked: Cooked kebabs freeze well too. Thaw overnight in fridge, then reheat in a skillet.
The Story Behind Dastarkhwan
In Pashto, “Dastarkhwan” literally means a dining spread or tablecloth, but it’s so much more than that. It represents hospitality, generosity, family, and the breaking of bread together. When you lay out a Dastarkhwan, you’re not just serving food - you’re creating a space for connection, for sharing stories, for making memories.
Growing up, I didn’t understand the weight of what sitting at my Khoozh baba’s Dastarkhwan meant. It was just where we ate, where he’d pull me close and feed me the best pieces from his plate, where the whole family gathered and talked and laughed. But now, living thousands of miles from home, I realize those moments were everything. They were love without translation. They were cultural identity passed down through saffron-scented rice and perfectly spiced kebabs.
This series - Deeva’s Dastarkhwan - is my attempt to share that with you. Every recipe I post here is a piece of my heritage, a memory, a connection to where I came from. Some recipes, like this one, are directly from my family. Others are dishes I’ve learned and made my own along the way. But all of them have one thing in common: they’re meant to be shared, to be enjoyed together, to bring people to the table.
Thank you for sitting at my Dastarkhwan. These kebabs carry so much of my heart, and I hope they bring warmth and flavor to your table the way they’ve always brought it to mine.
When you make these, you’re not just making dinner - you’re connecting with centuries of Pashtun culinary tradition, with border towns where these kebabs sizzle on every street corner, with my Khoozh baba’s kitchen where love never needed translation.
From my Dastarkhwan to yours 🤍
Make these and tag me on Instagram @deevaandfood - I can’t wait to see your Chapli Kebabs!
Related Recipes You’ll Love:
Serves 8-10 kebabs | Prep Time: 20 minutes | Cook Time: 15 minutes | Total Time: 35 minutes